Pages

Wednesday, June 25, 2014

Local Gems - Sacramento Food Co-op


I LOVE the Sacramento Food Co-op! I feel like I am not only supporting my own health by shopping there (whenever I can), but also that I am helping support a local community business focused on providing healthy and sustainable foods and products for those living in their community. The Co-op begain in 1973 as a food purchasing group. They expanded a couple of times over the years, and now have a store conveniently located in downtown Sacramento. Their purpose:

"To be a trusted source of natural foods and products, and a reliable resource for consumer information."

They have a great selection of natural, organic and grass-fed foods and products. Which is great! They also have a bulk herb section and an essential oils section which supplies most all of the essential oils for any projects on my blog.

BUT, probably my favorite thing about the co-op is all the great classes they offer.  From gardening, to fermenting, to growing your own foods, the co-op, partnering with other great places like Soil Born Farms, offers classes and reasonable rates.  If you are an owner at the co-op, which is like being a member or different ;), you get a discount on most all classes as well.

"2001 marked the year that we first opened the doors to our Co-op Community Learning Center, adjacent to the Sacramento store and home to cooking classes, health seminars and a variety of owner meetings and special events. We are committed to serving our Co-op owners and supporting our community through consumer education, owner meetings and events, outreach activities and charitable programs and projects."
I highly recommend checking them out if you haven't already! :)

Monday, June 23, 2014

Dry "Shampoo" - AKA No-Poo

Dry shampoo - sounds weird doesn't it?? When I first heard about this I thought, "that's crazy, it can't possibly work." But then I began my dive into all things (that I can manage) natural, I learned that it isn't not only possible, but it is better for your hair (which makes sense).

Our natural oils in our hair are their to help keep our scalp healthy and our hair strong and growing normally and naturally.  I had already embraced the idea of going two and sometimes 3 days between shampoos. People I have read about on other blogs go even longer or simply do not wash their hair in the traditional (commercial) sense at all. In fact, many commercial companies have come up with their own version of Dry Shampoo in order to keep up with the growing trend of waiting between lathering.

It seemed only natural for me to make the leap and give the dry shampoo a try, however I wasn't out to spend allot of money on chemical dry shampoos in pressurized cans. In fact, while researching I found that one of the ingredients in the homemade dry shampoos was corn starch... I wasn't sure I had some, but I had tapioca starch and didn't know if that would substitute well.  I actually found my corn starch, but then saw that Herbal Essence makes their commercial dry shampoo using tapioca starch! go figure!

Not only is it better for your hair to wait between washing, and to limit the amount of chemicals we use to strip our hair of its natural defenses, the idea of dry shampoo appealed to me from a preparedness perspective. What if there was an emergency or other event that limited our availability of fresh water. Some practiced alternative cleanliness methods would be great to have in our survival tricks.

At any rate, the recipe I ended up choosing was from... you guessed it... Wellness Mama! She has a couple of versions of her dry shampoo, including a spray version (which is not so much dry, but works the same way).  I chose the version for darker hair, since that's what I have, but then I modified it for red hair using cinnamon.  I tell you what... I smell absolutely YUMMY right now! :)

Ingredients for Red Hair:
  • 2 Tbls Corn Starch (or Tapioca Starch, or Arrowroot Powder)
  • 1 Tbls Cocoa Powder
  • 1 Tbls Cinnamon

Ingredients for Dark Hair:
  • 2 Tbls Corn Starch (or Tapioca Starch, or Arrowroot Powder)
  • 2 Tbls Cocoa Powder

Ingredients for Light Hair:
  • 4 Tbls Corn Starch (or Tapioca Starch, or Arrowroot Powder)
  • 5 Drops Essential Oil (Optional)
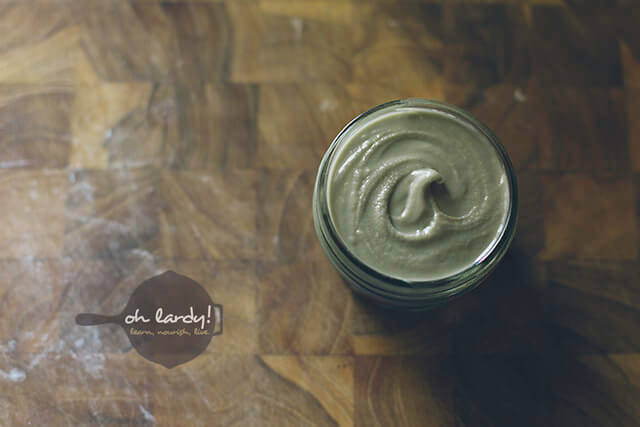
If using multiple ingredients you want to combine them before putting in your container.  I chose a spice jar with a cap so that my dry shampoo will be protected, on my bathroom sink, from any shower steam.

Once combined I used a funnel and small stick to get the powder into the spice jar.  I then shook the contents onto my scalp separating the hair line occasionally and working the powder onto my hair. I did this all over my head.


Here is a before pic of my oily hair.  It has been 3 days since I shampooed. You can see that it is shiny, and the strands kinda hang out together up there...

Once you have the dry shampoo worked into your hair well, you want to let it sit for at least a couple of minutes to let the powder absorb the excess oils in your hair.  Then you can shake, brush, or comb it out.

Here is the after pic.  You can see that my hair is no longer shiny/oily looking and the strains are separated and look more fluffy. (The color difference is due to the lighting differences of the location where I took the photos: above-Kitchen, below-bathroom)
It is my understanding that getting you and your hair used to using the dry shampoo is a bit of an adjustment period. 

Thursday, June 19, 2014

DIY Natural Sunscreen

Just in time for summer! Experiment number two... homemade sunscreen! :) I got the basic recipe from my favorite natural blogger Wellness Mama! I highly recommend her blog, she knows her stuff.

I wanted a more natural product for myself and my kids to use this summer, and one that won't pollute any water source with chemicals, etc. Those little beeswax pastilles take a while to melt, but all in all, it took less than 30 minutes to make including gathering the ingredients and materials to finished product.  Makes 1/2 pint jar worth of sunscreen (approx 1 cup).

This sunscreen is a "Physical Sunscreen". What that means is that this will block or reflect the UVA and UVB rays instead of absorbing them. According to Acne.org:
"Physical sunscreens: Physical sunscreens reflect or block the sun’s rays. There are two physical sunscreens: zinc oxide and titanium dioxide. Zinc oxide is the gentler of the two and offers superior sun protection. Physical sunscreens tend not to clog pores and stay effective all day long, no matter how long you are in the sun. However, products with physical sunscreens are drying to the skin, and due to the physical nature of zinc oxide and titanium dioxide, most brands go on white and leave the skin looking pale."
www.acne.org

We have addressed the drying factor with the natural oils used in this mixture, and also when I applied it to my hand there was no white residue.  I am very pleased with the feel, texture and appearance of this sunscreen. 


Ingredients:

  • 1/2 cup olive oil
  • 1/4 cup coconut oil (natural SPF 4)
  • 1/4 cup beeswax (or Emulsifying wax, Soy wax, Carnauba wax or Candelilla wax)
  • 3 Tablespoons Zinc Oxide (This is a non-nano version that won’t be absorbed into the skin. Be careful not to inhale the powder). 
  • 2 tablespoons Shea Butter (natural SPF 4-5)
  • 1 tsp coconut extract for scent

Directions:

  1. Combine ingredients except zinc oxide in a pint sized or larger glass jar. I have a quart Ball jar that I keep just for making lotions and lotion bars (or you can use a double boiler.)
  2. Fill a medium saucepan with a couple inches of water and place over medium heat.
  3. Place jar in the pan with the water. (unless you are using a double boiler, then use as directed by manufacturer.)
  4. As the water heats, the ingredients in the jar will start to melt. Stir occasionally to incorporate. When all ingredients are completely melted (beeswax will take the longest to melt), add the zinc oxide, stir in well and pour into whatever jar/container you plan to use.  I used a pint sized jar.  (this makes just over 1 cup)
  5. Stir a few times as it cools to make sure zinc oxide is incorporated.
  6. Use as you would regular sunscreen. Best if used within six months.

Application:

This sunscreen can be applied immediately before sun exposure and will last all day unless it gets wet. It should be reapplied after sweating or swimming. This sunscreen should have an SPF of approximately 20+.  Please use caution as always while in the sun and test yours for desired use.

Updates: I added vegan wax options for use instead of bees wax, and for those who may have bee allergies.  Also, while Zinc-Oxide is bad for you internally, the non-nano versions will not be absorbed into the skin.  Like any powders you need to be careful not to breath it in as it will stick to the lining of the lungs. If you touch this with your finger you can feel the "stickiness" of it. Once it is in the lotion it no longer poses any risk... Unless you eat it?? it does smell yummy, after all. :) OH.. and don't accidentally snort your lotion while smelling how yummy it is. ;)

My Angel used it yesterday for swimming at her friend's house from about 1pm to late in the day.  She is darker skinned, but didn't burn. She said the water beaded up on her skin where she applied the sunscreen and stayed that way for over an hour of swimming.

Wednesday, June 18, 2014

Fast Breakfast Mini Quiche

I am a fairly lazy person, and I love my sleep.  Eating paleo every morning can be time consuming if you don't plan ahead. Personally, I like to grab my food and go, so I was told about making these mini quiches using a muffin tin and they are great, easy, and quick to both make and take!


Now remember that we raise our own chickens for eggs and meat, so I am at least aware of where my eggs come from.  Most paleo folks will go on about the virtues of grass fed this or that, and all organic whatever's, but with 6 kids, I just simply couldn't afford all that.  Since they are moving on, and we will soon only have 2 living at home permanently, I may start paying more attention, but as it sits, I will leave the quality of the ingredients and where to procure them, up to you. :)

Generally I make my mini quiches with some type of meat such as bacon or sausage (I have used ham if there were leftovers, but that isn't my favorite), eggs, and then whatever veggies I have on hand that go well with eggs.


Here are the basic ingredients and directions:
  • 12 eggs
  • 8 Sausage Links (8 oz) (or equivalent breakfast meat of choice)
  • 2 cups diced veggies
    • for these I have used one or a combo of:: bell peppers, broccoli, cabbage, carrots, onions, and celery
  • Coconut oil spray
Preheat oven to 350. Fully cook sausage according to package directions or preferred method and then cut into bite-sized pieces. Mix eggs with wisk or blender and then mix in diced vegetables. Spoon egg/veggie mixture into greased muffin pan and then (because I am anal) portion out equal portions of sausage per muffin tin.
Bake in oven for 20-25 minutes or until cooked through.
Makes approx 12


Here is a list of other recipes for inspiration:
Breakfast on the Go Sausage Egg Cups
Paleo Omelet Muffins
Savory Breakfast Muffins

Tuesday, June 17, 2014

Sugar Addiction

I LOVE sugary foods!!! Mostly ice cream... that is my kryptonite!


Sugar can be addicting... it increases dopamine levels in the brain similar to drugs like heroine. A study reported that “rats with intermittent access to food and a sugar solution can show both a constellation of behaviors and parallel brain changes that are characteristic of rats that voluntarily self-administer addictive drugs. In the aggregate, this is evidence that sugar can be addictive.”

Aside from saying that sugar can actually be addicting, it is the way sugar is consumed that can also be a factor in addiction.  Mostly that intermittent consumption (several times daily) plays a roll in sugars addictiveness.  They also showed that after periods of abstinence, the use of sugar increased after it was reintroduced, and that the longer the period of abstinence the greater the increase usage.  I found this part to be particularly pertinent to all those people who diet and then as soon as they reach their goal, they go right back to eating the way the used to, and not only gain back their weight but gain even more than they lost in the first place!

I know from personal experience that this feeling of wanting even MORE sugar once I cheat on my diet is very real.  I often binge on sugary foods after I haven't had them for a while.  When I completed my Whole30 the first time, I went back to eating poorly after my first slice of bread! I got up to eating ice cream (or shakes, etc) 2-3 time per day!!  I feel not only depressed about my poor eating habits, but I feel tired and just slightly ill on a continual basis from eating these bad foods. Also, when I feel hungry, I have such a drop on my sugar levels that I can't even think clearly, and I am so grouchy until I can get something to eat, that I want to chew someones arm off!

When I was on the Whole30 plan, I began to feel much better, and less hungry all the time.  I also didn't feel the same driving need for food when meal time rolled around.  Even my family noticed the difference in my mood and my behavior... when I WAS hungry I WASN'T chewing anyone's arm off. Caveman even commented about the difference. That alone was all the motivation I needed. I needed to find a way to live without processed sugars forever.  Like an alcoholic must forgot all booze, or as in my case again, a smoker can't have even one cigarette without spiraling back to a pack a day...

For those of you that don't know, Whole30 is a meal plan designed similarly to Paleo but even more restrictive.  It emphasizes protein, fat and fruits and vegetable consumption while eliminating white carbs such as sugar, white potatoes, and grains.  There are other food restrictions, but not much.  It claims to reset your sugar cravings, etc.  All I know is I felt better on it, but when my 30 days were up, I hadn't' really lost my sugar "addiction". So a few more months went by with me eating junk food before I decided that 30 days wasn't' going to be enough and I need to make a complete life change if I was going to stay healthy and happy.

I have since made a conscious decision to maintain a paleo lifestyle. I managed for about a month with great results in my energy and my mood-swings. I am now in a lull after my trip to Mexico at the end of May, but I know the only way to beat this thing is to get right back in.  Today is going to be a good day...


Some of my favorite Paleo Blogs:
PaleOMG
NomNom Paleo
Wellness Mama (Grain Free)

Monday, June 16, 2014

Homemade Natural Deodorant

As part of my homesteading journey, and my desire to be more natural and more prepared should anything happen to us financially or otherwise, I have been researching various "do-it-yourself" natural cleaners and toiletries.  The first one I was able to try was this recipe for home made deodorant from Oh Lardy.

My friend Jackie introduced me to this as it is the one she uses as well. When I first used it, I warned my coworkers that I was trying my home made deodorant and for them to please let me know if they can smell my BO. :)  I have great coworkers so this went over with much joking, but they informed my at the end of the day that they didn't' smell me at all. Trial one successful. I have been using it for over a month now!

The second big trial which happened naturally, was when we went backpacking for 3 nights (Friday - Monday) just a couple of weeks ago. I was only able to apply the deodorant on Friday before we left. Let me tell you that it works! Even sticking my face in my armpit (you know you have done it before, too, so don't lie) I barely had any BO compared with other camping trips I have been on for less time! I am sold on natural deodorant!

Ingredient List:

Directions: 

Mix all of your ingredients together and store in a small jar in your bathroom.  Deodorant will be a paste.  To use, scoop small pea sized out with your finger or orange stick and apply with your fingers like a lotion. Use more if needed.

Purpose behind ingredients and Why it works!

Body odor is caused by bacteria which grows in the moist areas such as your under arms.

  • Both coconut oil and the essential oils suggested have natural antibacterial qualities which keep these little buggers from growing and smelling.  
  • The essential oils also have a pleasant smell that is good in and of itself. :)
  • Baking soda neutralizes the acids produced by the bacteria and help to maintain a normal PH under our arms which also controls smell
  • Bentonite Clay and Arrowroot powder (or other starch) absorbs sweat as well as the toxins that exit your body in your sweat.  Bentonite Clay is a well known detoxifying agent use in facial masks, body masks and also internally for detox purposes.

Now for the caveat... Coconut oil will liquefy at temps over 76 degrees. I have it on my upstairs bathroom counter and the coconut oil separates from the solids. This happens because my upstairs bathroom doesn't stay cool enough and the oil liquefies. Because the container I used was just big enough that the deodorant filled it to the top, this caused a small oil mess on my counter for the first couple of days (until I used enough out of the jar). I currently use a small nail tool to stir my deodorant before using, but I plan to alter my next batch with beeswax to make it more solid. I will post that recipe as I make it. :)

Wednesday, June 11, 2014

Meet Barnaby!

Caveman and I regularly talked about getting a larger animal.  Now in case you didn't know, we live in an old suburban house on a double lot.  Caveman says we don't even have a full acre of land, I am not sure, but our yard seems big enough to me. :)  We currently have a rabbit warren,
Rabbit Warren
chicken pen, and a vegetable garden in the yard (more on all of those later) but there are enough weeds to keep a large animal happy for a while. At least until butchering time.

Enter Barnaby....
I asked my friend at work, she lives in Dixon, CA and has property and just so happened to know a family that raised a bunch of goats. Perfect! We need a goat to eat all our weeds so our dog, Fergie, doesn't get fox tails up her nose again (those hurt and they are expensive!).

Picking out Barnaby was allot of fun! Let me preface with the fact that my personality is such that when I get an idea I want to do it now! so Friday after work, my husband and I drive over to the gals farm.  She has pigs, 6 goats, 1 cow, and some chickens... I find myself envious of her large property and the fact that she gets to stay home and tend to the house and the animals.

So here I am in my skirt and heels walking through the dirt clods and going into the gate with these 6 goats (the cow stay off in the distance, apparently sensing we are looking for the meatiest morsel). The goats crowd around us, having been bottle fed, they are very tame and looking for food.  I tried hopelessly to fend of 3 of the goats trying to headbutt me and/or eat my skirt, while Caveman made up his mind which one will hop in the back of the pick-up.

Once we get one picked out, our gracious hostess offers us a dog carrier to take the goat home in. Caveman is dubious, "he grew up on a farm and they NEVER transported goats in dog crates, it couldn't possibly work", but we convince him to give it a shot and lo and behold.... he fit fine (wish now that I had got a picture of that!).

As soon as we got him home, my youngest immediately names him Barnaby. With only a little halfhearted protest from my 17 year old, Barnaby became the goats name.